


Minibook Marvel Tutorial :: part three

My goodness — hello there! I didn’t mean to disappear like that! What started out as a harmless change up of the weekend became a Monday morning with a construction crew on the road, a lovely on-and-off-and-on-again effect with the power and now scaffolding that covers all our windows. And although I am sure all the construction workers are fine and lovely people, there seems to be no Diet Coke break effects, merely a strange feeling of living and working in a fish bowl! Anyway, it now appears that the power will stay on so I’m trying my best to catch up! Shall we finish off this nice and simple minibook then? Four more basic designs to get you started with your punches… and of course you can add as much to these as you like to get things just right for your book!
The page above uses a portrait 2×3 photo on a shipping tag, with the bottom of the tag punched with the loopy border punch from Martha Stewart. Behind the tag is a stamp from Hero Arts stamped with black ink on green cardstock, then cut out with scissors. The photo is stapled to the tag and that punched edge hangs off the bottom of the page so you see a bit of the border even when the book is closed.

Same border punch here, with two 2×3 photos. Just punch the border from two pieces of cardstock between 5 and 6 inches wide, then layer them with the loops slightly offset. Add a strip of narrow ribbon over the top of the photos and secure the ends with brads. Add journaling and butterflies of course!

Instead of strips of cardstock, cut a box that is about 5.5 inches square and adhere a 3×5 photo to the bottom half. Then use a flower punch to create a shaped window in the top right corner and place contrasting paper underneath — just something a little different than gluing the punched piece over the top. Punch or cut two squares from brown cardstock and cut them in half on the diagonal to make simple photo corners — and dress one up with a tiny butterfly. The title is the same as the one on the cover, cut with the Silhouette SD.

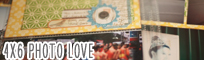
To close, create another border that follows along the side of a 4×6 photo, but instead of one punched piece, punch three pieces and layer them. Use a pencil to roll each border piece up so they don’t just lay flat. Ink on the punched edges will help the design show up as well. Add a tag with a flower and a butterfly, and tuck some tiny butterflies (or gems or anything else you fancy) into the layers of the border pieces to finish.
So that’s that — then each page design repeats somewhere else in the book to create 16 6×6 pages in total. There’s a butterfly somewhere on each page — partly because I really love them right now and partly because I like having something that remains consistent from page to page in a small project like this. A mini like this is quite different to my normal 12×12 scrapping — and it’s nice to return to just a small set of supplies now and then. This is the type of project you could easily take on the road since everything you need would fit in your handbag! I can’t say that about the majority of my scrapping supplies unfortunately!
Now I have another mini to share with you and ordinarily I would say ‘tomorrow’ but clearly that might just jinx me at this rate! So cross your fingers and with a bit of luck it shall appear ever so soon! (Thanks for hanging in there for my delayed Friday on this little project!)
xlovesx
![]() Read more about:
Read more about:
Next post: Happy Easter!
Previous post: Minibook Marvel Tutorial :: part one