Camera School 04 :: Notes on Aperture (or that blurry thing)

Back in lesson two, I promised no triangles to explain exposure. That’s because memorising ISO gets rid of one point on the triangle (and if you read lesson two you’re remembering your rough settings of 100, 400 and 800, right?) and in this lesson, we’re going to eliminate another point on the triangle: aperture.
First, let’s get over the weirdness of the word aperture and how it applies. Cardmakers, you can come into your own here because aperture is part of cardmaking lingo too! An aperture card is a card with some sort of cut-out in the front, like a window (often a circle) that lets you see inside the card before you even open it. Well, on a camera the aperture is that window – in the lens. Aperture just means opening, and there has to be some sort of opening on the camera or how on earth would we ever take a picture? The real question is does your camera (or lens) allow you to adjust the aperture?
On an SLR, the answer is pretty much always yes. On a point and shoot, the answer used to be always no, but point and shoots (and bridge cameras) have made a great deal of progress lately so now the answer might just be yes. If you don’t know if your point and shoot gives you any aperture control, either look up aperture in your manual now or don’t even get up from your chair – just open a new window and type “Can I adjust the aperture on model of camera here“ into a search engine. The internet knows everything – someone out there will have posted your answer if it’s possible, and probably written a post with example images as part of a camera review! Oh internet, whatever did we do without you? If the answer for your point and shoot is no, then you can skip the shots at the end of this, but if you’re ever thinking of upgrading, this concept will prove quite useful.
Adjusting the aperture just means making that window bigger or smaller. Have you seen a very old photo – maybe of a house in a field – where everything seems to be in focus? Those were mostly taken with pinhole cameras, with the teeniest-tiniest of apertures. If you look through just a pinhole, everything you see is in focus. The reason those photos were often of buildings was because buildings didn’t move. See, if you’re only letting in just a pinhole’s worth of light, you need a fair bit of time to take the photo, otherwise the photo will be too dark. With people or anything else that moves, that just doesn’t work, but buildings are usually happy to stay put as long as you would like!

Sometimes it’s just not practical to sit there with your lens open for seconds or even longer. The moment will be gone, something will have moved or you will have lost your patience! So we adjust the aperture to let more light into the camera – we make the window bigger. But that means not everything will be in focus any more. It does, however, have a side effect – the bigger the window, the softer the blur in front and behind your point of focus. The example just above is from this post all about my love of that blur. The aperture on this shot was as wide as the lens would go. (In this case, 1.4 on a 50mm lens, for those who like those kind of details.)
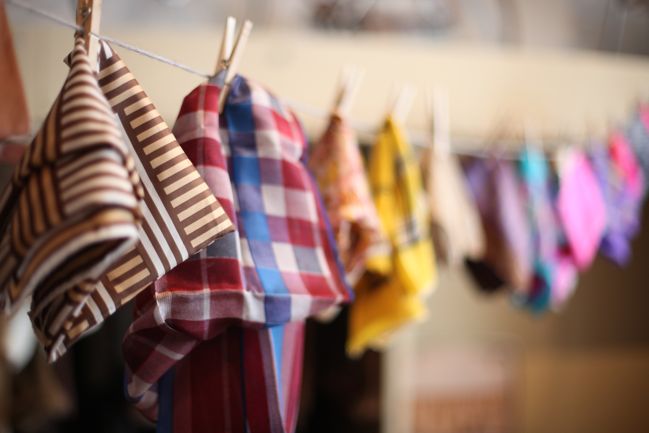
Just like ISO is made easier by remembering just a few rough points, aperture is exactly the same. Take this picture for example: it’s shot with a very wide aperture, which you’ll also see referred to as ‘shooting wide open’ or having the lens ‘wide open’. If I wanted to focus on just that particular handkerchief, then I’m all set. If I actually meant to make all of them visible, then I’ve failed miserably. The wider open the lens, the less of the scene will be in focus. Something small like a pinhole would get everything in focus (provided it didn’t move!) but that wide aperture makes it impossible to focus on everything.
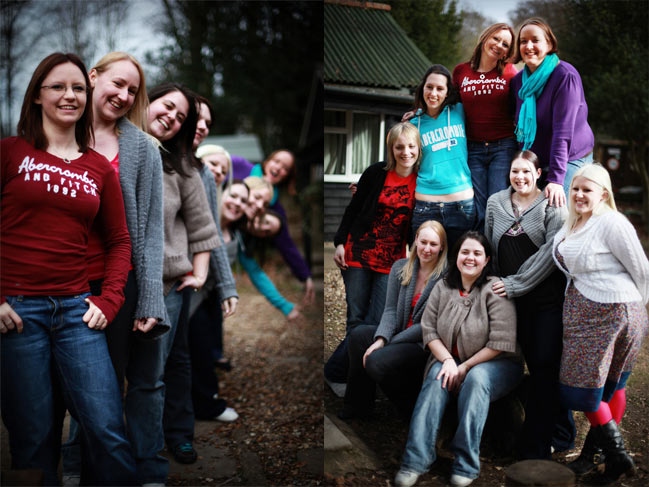
With handkerchiefs and flowers and cupcakes and assorted other objects, a bit in focus and the rest blurred is lovely. But there are times when it doesn’t work – namely with people. If you photograph a group of people, usually you want to see all of them. The shot on the left uses a wide aperture, so when photographing something with depth – like all these girls lined up toward the camera – most of the depth will be blurry and only a bit of the scene will be in focus. It’s an interesting look in this case but it doesn’t help you know all those faces at the back of the line.
There are two solutions to this: move the people or change the camera settings. The image on the right moved the people. Now they are mostly at the same depth, so I could get the girls in focus but the background is relatively soft.
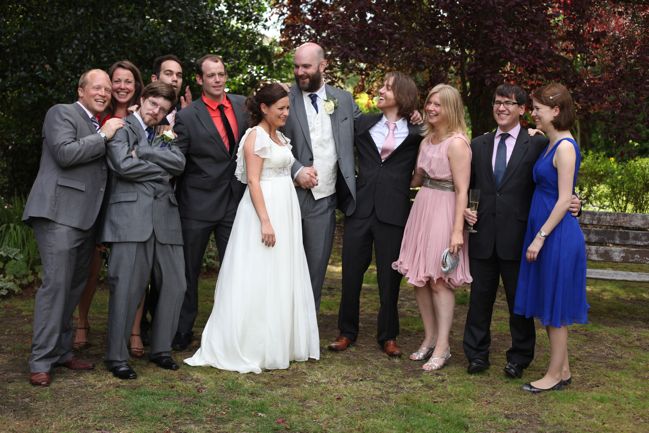
Or here’s the second solution: change the camera settings. While the two photos of the girls were shot at a very wide aperture (1.4), this little outtake with friends of the bride and groom was shot with something smaller (4.5). That makes more of the scene in focus.
I think the real reason why aperture can get confusing sometimes is its measurement in numbers. Numbers for ISO, numbers for aperture – it can look like a lot of maths going into a picture! And at some level there is but we don’t have to get that technical. If we can remember the 100-400-800 guideline for ISO, we can do the same for aperture. Hear me out.
If you have an SLR, look at your favourite lens. The full name of the lens tells you what apertures you have available. It’s usually painted right onto the lens itself, but you can also just look it up on the item description of any camera store site. So say you have a 50mm lens. If you’re a Canon user for example, the most popular options for the 50mm are this 50mm 1.8 and this 50mm 1.4. Those numbers at the end refer to the aperture. The 1.8 lens is much cheaper than the 1.4, and the aperture is a big part of that. (The 1.4 is also made with more expensive and more durable materials in both the lens housing and the glass itself, so the difference is more than just the aperture, just to be clear.) What you need to remember is the lower the number, the more it will blur. Or if it is easier for you, the smaller the number, the smaller the plane of focus. They mean the same thing, but I think one or the other usually sits a bit better so choose the one you like best!
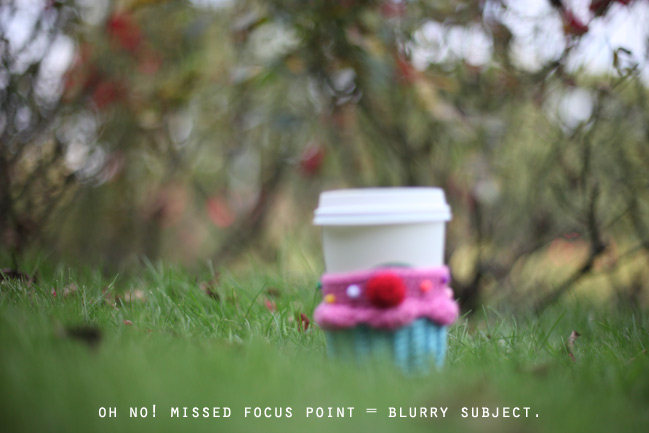
Either way, if you’re shooting at 1.4 or 1.8, you have to be careful where you focus because you’re only working with a small area that will be clear. I tried to focus this without looking through the viewfinder and the autofocus thought I wanted the grass rather than the coffee cup. Um, no… not what I wanted. With objects like this it’s easy to just refocus and shoot it again, but what if that were a toddler or a puppy? Yeah, not so much on getting that shot again, right?
Not all lenses go down to numbers that start with one. The 100mm macro goes (for ultra close-ups) to 2.8 and the 17-40mm (for crazily wide shots) goes to 4.0, but both of those lenses will blur a great deal at their lowest numbers. (Especially the 100mm – this is one of the first photos I took with the 100mm macro and it’s nearly all blur!) So you don’t need a really low number necessarily – but you need to know how low your lens can go. (Did you just say that like the limbo chant? I am really hoping you did.) Once you know how low it can go, you just need to remember that lowest number is going to have the most blur (or the smallest plane of focus – whichever you prefer).
If you can remember just that, then the rest is easy. Because if a low number gives you the most blur, what will the highest number give you? The most IN FOCUS. Or the least blur. Same thing. So really this is not complicated math – this is remembering one thing and that one thing will make the rest make sense.
Now let’s actually take some pictures to start to see this happening. Just like ISO, there are two options for this assignment. If you don’t know how to change the aperture on your camera, now is the time to learn! If you have an SLR, it’s probably easier than you think. You can put your camera in Aperture Priority mode (look for A or Av on your dial) and then you’ll be able to set the aperture but let the camera do the rest. You can use your camera manual or you can search for ‘how to set aperture’ or ‘aperture priority mode’ plus the model of your camera and there you will likely find pictures of your exact camera so it’s super-easy to follow. Basically you’re going to use one dial to set it to Aperture Priority then use the other dial to change the aperture to what you want – and the numbers will show up on your screen, but if that sounds problematic, there will be pictures of your exact camera in the manual or online so you can follow that.
Once you know how to change the aperture (or if you already knew that!) then find a scene with some depth – some things closer to the camera than others. Take two pictures – one at the lowest number you can dial to and one at the highest. I have to admit, this is the least original idea for a photography assignment, but this really is the easiest way to see just what your camera can do. Look at the two shots side by side and see just how much range your lens has. Give it a try and then come back tomorrow for something way more creative!
![]() Read more about: camera-school
Read more about: camera-school
Next post: Giveaway day!
Previous post: Scrapbooking Sketch of the Week


