


Using Japanese Bookbinding to Create a Mini Album:: A Scrapbook Tutorial by Meghann Andrew

For my husband’s first father’s day this year, I wanted to create something more personal than a card. I was looking to create a mini-album of sorts, but one that looked more like a card with a thin binding, rather than just using a hole-punch & binder rings, or a pre-made chipboard album. I turned to my trusty search engine to help me find options for book bindings & I quickly discovered the beauty of the Japanese bookbinding method. We both ended up loving the finished album, and now this is my ‘go-to’ technique for creating a fast, simple mini.
What I love about this technique is that it is a) very easy, it only took me a few minutes to learn; b) I had everything on hand to achieve the method, especially loads of patterned paper and colorful bakers twine; and c) it looks beautiful and creates a thin, easy to store mini album.

Begin by choosing a selection of patterned paper. In this case, all of my paper was from a single kit, so I knew that it would coordinate, and made my selection process faster. Choosing patterns from a single manufacturer’s collection would also ensure a fast selection process. Make sure that you only use paper in which you like the front & the backsides, so that there is less bulk in the album base. My pages are all sized to 5”x7”.


This binding method is permanent, so it is important to know how many pages that are needed at the beginning. This binding is very secure, so you can include just a few or a lot of pages for your album. I printed my photos & attached them with removable adhesive so that I knew what order everything was going in and that I had the right number of pages.


Once all of that is sorted, use a scoring board to score along the edge that you will bind, ½” from the edge. This will make it easier to turn & fold the pages later on.

Next, mark your holes using a ruler and pencil. On my album, the top & bottom holes are 1” from the edge and the middle hole is centered along the length at 3½”.

Use a 1/8” hole punch to punch a hole where you have marked. My punch will not go through all of my pages at once, so I punched the first page, then used that one as a template for the remainder of the pages.

Once the pages are all punched, cut a piece of baker’s twine roughly three times the length of your album. Thread a #1 embroidery needle with your twine.
To save you looking at 20 photos for the actual binding method, I’ve put it all in a quick video for your viewing pleasure (my first ever!).


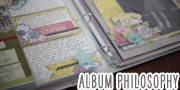
Once the album is bound, add journaling cards & photos to your foundation pages with permanent adhesive.

Now for the fun part— if you haven’t already had fun! Select a group of coordinating embellishments. I find that by limiting myself to a selection of embellishments from the start, the process moves a bit faster. Also, it’s important to stick to less-dimensional embellishments for the interior pages, as the mini album is not as bulky as most.

Once you’ve embellished your album, you’re finished! Not only do you have a completed mini album, but you’ve also learned a useful, new binding method for creating your own, custom mini albums.
| Meghann Andrew is a former interior designer turned stay-at-home-mom to a thriving 9 month-old micro-preemie. When not spending time with her family, which also includes her English husband & English Golden Retriever, she enjoys cooking, baking, spinning (to burn off the calories from all of the cooking and baking) and creating beautiful things with paper. She currently designs for American Crafts & is on the contributing team for Elle’s Studio. |  |
![]() Read more about:
Read more about:
Next post: Five Things Vellum by Mandy Koeppen
Previous post: Five Different Ways to Use your Photos in Project Life by Abigail Beach