


Scrapbook Starting Points :: Four Small Photos

This morning I had every intention of being on the train into the city nice and early so I could do one of those very rare things in my world and work with people actually in person instead of through email inboxes. Except it has snowed and snowed and snowed some more this past weekend, and the trains in our corner of London are not running. So instead, I am scrapbooking. I think I can cope with that idea, provided we can reschedule our day of working in person for sometime soon.

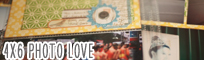
As a result of that, here’s a starting point! It started with a full sheet of patterned paper for the background, two narrow strips (they were the two off-cuts from that large square on the last sketch layout), and two 4×6 cut-apart cards, plus an off-cut of what was left of the camera print in the middle. Everything here is still from my January kit of supplies – this is the fourth page to come from that stack of goodies so far.
 Oh snow, you have taken away all the natural light. Perhaps I can rephotograph this soon.
Almost everything on the completed page is still from those supplies – including lots of the button card used to create the bunting. I added the thread to finish that detail plus gold and black mists and three pink enamel dots for that little row of embellishments in the middle. The stamped ‘Happy’ words at the right are just stamped with regular black ink, but faded to match the ombre pattern of the striped paper by simply adding more pressure or stamping off some of the ink.
Once this was finished, the combination of the tall narrow strips and the small photos reminded me of this sketch, though there are certainly a few differences. Worth a comparison if you have more narrow strips left than larger boxes.
If you want to give this starting point a try, choose any papers you want and arrange them in a similar fashion to the second image in this post. Then ignore my finished layout and complete your page to suit your style and photographs. When you’re done, share your project with us so we can see all the different ways that same starting point can continue to a completed design.
Have a great week – and if you get snowed in, at least you can always scrapbook!
![]() Read more about: scrapbook-starting-points best-of-both-worlds-kit
Read more about: scrapbook-starting-points best-of-both-worlds-kit
Next post: Jaime Warren shares her chaotic scrapbooking process
Previous post: Sketch to Scrapbook Page :: Scrapbooking with two photos in quadrants