pretty paper. true stories. {and scrapbooking classes with cupcakes.}

lovely to meet you Twitter Facebook Pinterest YouTube

Take a Scrapbooking Class

online scrapbooking classes

Shop Shimelle Products

scrapbook.com simon says stamp shimelle scrapbooking products @ amazon.com shimelle scrapbooking products @ amazon.co.uk

Reading Material

travel

Direct the eye with arrows on a scrapbook page

Direct the eye with arrows // scrapbook page by Leigh Ann Odynski

Happy Friday! It’s nearly time for us to kick off a weekend of scrapbooking fun for NSD, but first one more look at arrows! Contributing designer Leigh Ann Odynski has a beautiful page to share, along with a brilliant technique for combining clean cutting with an etched shape in the cardstock, using the Silhouette cutter. Let’s get to all those points!

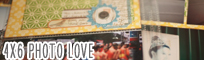
For the Arrow Challenge this week, I wanted to use a photo of our local landmark the High Roller. Looking at the photo, I knew I wanted to try circles as a design element to highlight all the circles in my photo. I found the sunburst background cut file at the Silhouette Design Store and thought the rays mimicked the cables on the wheel. So now, before I even started the page, I had a direction for the layout.

When I cut the pattern on my Silhouette, I forgot to change the depth, and it didn’t cut all the way through my paper. It was a happy accident though, because it led me to use an Exacto knife to cut out every other ray on the design. The other rays are subtly etched into the cardstock for a unique detail. This arrangement gave me fewer rays to fill with punched circles and worked out better as far as how many colors I wanted to showcase. You can use 5 different sized circle punches to punch out different Shimelle Starshine and True Stories papers. It was so fun to pick from the large variety of patterns you get in each color. Arrange them behind each ray and adhere. I used quick dry glue to adhere just a part of each circle and lifted up the edges for added dimension.

Direct the eye with arrows // scrapbook page by Leigh Ann Odynski

I stitched around each sun ray that was backed with circles, and around the edge of the Starshine Mariner paper. Fold down the top portion of the blue patterned paper and pick cut apart strips to add around your journaling block. The title in white glitter Thickers makes sure that the colors on the layout stand out and adds another texture and sparkle!

Did I forget about the arrows? No, I added arrows to point to the photo on the sun rays without the circles. You can add enamel shapes or any Starshine Embellishments you like in between rays.
I added mine on the edges of the stitching to give more texture and interest to the layout.

Direct the eye with arrows // scrapbook page by Leigh Ann Odynski

Add a doily or other circular paper behind your photo and pop it up on dimensional foam. Then stitch underneath the title, and you have a completed page.

Direct the eye with arrows // scrapbook page by Leigh Ann Odynski

I like to try to think of new ways to use my supplies, and I hope you enjoyed this variation on the sunburst design. What ways can you think of to use cut files other than they were intended?

Happy crafting and I would love to see your pages shared below when you try this challenge out for yourself!

Weekly Challenge :: Scrapbook with Arrows

weekly challenge: scrapbook with arrows // older scrapbook page by shimelle laine

The above posted with much irony. I am not feeling very hip or fancy or cool lately! But it doesn’t mean I’m not still having fun. Today I packed a lunch with everything except the broccoli cut into the shape of train cars. That is totally the definition of cool, right? I should scrapbook train shaped sandwiches. That would take it to a whole new level of cool.

But what I’m really meant to draw your attention to is not the ‘cool’ of it all but that big arrow! I challenge you this week to scrapbook with arrows. Arrows with stamps, die cuts, patterned paper, stickers, chipboard, or paperclips, perhaps! Everything else is completely up to you, so you can take your inspiration in any direction you like!

weekly challenge: scrapbook with arrows // older scrapbook page by shimelle laine

A few years ago, Marcy Penner shared this tutorial for creating arrows from patterned paper scraps, and there’s also this sketch and video in the archives, if that helps you get to the point with your page design. But for brand new inspiration for this week’s challenge, take a look at these examples from contributing designer Heather Leopard and guest artist Mandi Holmes.

weekly challenge: scrapbook using arrows // scrapbook page by Heather Leopard

weekly challenge: scrapbook using arrows // scrapbook page by Heather Leopard

Bryan and I recently went to Santorini, Greece as part of our anniversary trip. One of the most memorable things we did was ride donkeys down the Caldera cliff to the dock and back up again. The cable cars were not operating out so we figured we’d be adventurous. Because it is a very treacherous cliff, it meanders back and forth across the mountain. I thought it would be fun to tell that story not just with the pictures and words but also through the design of my arrow.

weekly challenge: scrapbook using arrows // scrapbook page by Heather Leopard

I designed it so that it leads you back and forth up to the top. I wanted the arrow to lead to the photo and then I included another “Is this for real?” arrow to lead to the photos, then another arrow pointing to the top of the cliff. I rounded it out by including a small film strip of other memorable photos from the ride.
- Heather

weekly challenge: scrapbook using arrows // scrapbook page by Mandi Holmes

I created this page because I have a love with old buildings and items that were once popular. I love capturing these moments in a scrapbook page because it helps keep their history alive.

weekly challenge: scrapbook using arrows // scrapbook page by Mandi Holmes

For the journaling on this page I wanted to have it hidden since there were a lot of facts about the windmill. That gave me a good place to start with the arrows, and I stitched one to point toward the hidden journaling and make it a bit more obvious so it can be read. Then a second stitched arrow points to another important element on the page – the photographs!
- Mandi


You have a week to complete the challenge and share a link – but of course you’re welcome to set your own time schedule. Whatever keeps you happy and creative!

Today’s Guest Artist: Mandi Holmes loves cooking, doilies, and coffee. You can find more from Mandi on Instagram, Facebook, and her blog.

The Scrapbook Process starts Monday!

A brand new online class starts Monday – The Scrapbook Process! It’s never too late to join in, but this weekend would be a great time to sign up if you want the full live class experience, of course.

You can find the full written details about the class here, and the video above gives that information in a bit more conversational style!

To sign up in US Dollars:
Email Address for Class:

To sign up in UK Pounds:


Email Address for Class:


In other announcement type news: we’re just one week away from National Scrapbooking Day! Next weekend, there will be a full schedule of challenges here to keep you inspired! Challenges will remain open for the full week and following weekend, so you’ll have about ten days to participate if you like! Hope to see you then too.

Teaching craft by encouragement

teaching craft by may flaum

Last weekend, I was in Germany to teach some scrapbooking classes on strong design without spending a fortune on embellishments. One thing I love about that concept is it automatically answers one of the most common reasons I hear for people taking an interest but not actually trying paper crafting: ‘it’s expensive’. Like many things in the world, it can be expensive if you want to take those options but it definitely doesn’t have to be! I came back from Germany to find contributing designer May Flaum with such a complementary train of thought, and today she’s here to share her philosophy for introducing new crafters to the glorious world of pretty paper.

Crafting with people who don’t normally craft, or who are new to it can be quite the challenge. You want to make it inviting and fun, yet not overwhelm them. Hey there, May Flaum here and today I am excited to share an idea and video with you to make card making fun with yourself or with a group!

I often get asked how I teach my kids to craft and my short answer is: I don’t. The thing is I try to encourage them to play, explore, and discover on their own. One key idea is to come up with a simple formula as I have here (shape + paper scraps + simple sentiment + embellishments) and give just enough structure that people aren’t left wondering where to even begin. You want to inspire a person to try, to play, and to have fun. You don’t want to bog them down with rules and too much structure. Ah, but you don’t want them without a starting point either!

teaching craft by may flaum

Clear as mud? Don’t worry, I’ve got a video to help explain as well as show you how I’ve made my card. Here is my video tutorial for creating a card like mine:

I just love how this card turned out, and that it has the benefits of using up scraps and bits of my stash as well as giving a lot of creative freedom to the teens, tweens, and anyone else I might happen to want to create with.

teaching craft by may flaum

I also love this as a warm-up for myself when I’m not feeling especially creative, or a maneuver to avoid cleaning off my desk. Just use the scraps! I hope that you’ve enjoyed this video today and that I’ve inspired you to go make some cards with someone today. Crafter or not – we can all enjoy playing with pretty papers and fun embellishments.

Do you need a crafty warm-up today? Give May’s formula a quick try and share it with us!

Glitter Girl Adventure 138: On a Minc Mission

I recently purchased a Minc machine for metallic foiling and have used it easily enough for cards and gift tags, but I’m at a loss as to how to use it on my scrapbook pages. I have plenty of foil, so it seems only right to make this investment work for all my paper crafting, including my layouts! Glitter Girl, can you help?

Of course I can! This week, Glitter Girl takes on the challenge to use the Minc on her pages by customising 3×4 Project Life cards with metallic foiled fish to match some toddler artwork that needs a spot in the scrapbook.

I have the full size twelve inch Minc but the foiler is also available in a smaller six inch machine if that better suits your budget, your space, or your needs! This project would work perfectly fine with the smaller size, since the journaling cards are 3×4 inches. Do be sure you buy the Minc for your part of the world: as it plugs in and heats up, you’ll need the version with the right plug. They are available!

Other supplies for this page include the Color Chaos collection and Sand & Surf papers from Bella Blvd, enamel dots from Doodlebug Designs, letter stickers by October Afternoon, word stickers by My Mind’s Eye, flair badges by American Crafts, and a variety of washi tapes.

In terms of kids and artwork, I can already see why this becomes such a challenge over the years! He’s only just turned two and of course I already have a significant stack of paint strokes, colouring sheets, and other creative projects! (Stickers are big here. Of course stickers are big here.) We have a big art-student-style book with plain pages to paste things in and leave a little label with any relevant notes, but I’d like to include just a sprinkling of the actual pieces in our chronological family albums, and it struck me that it will work perfectly to include things that are a) the right size for a 12×12 page and b) have a corresponding photo that helps tell the story. Aside from letting him doodle on a card in my Christmas journal, I’m pretty sure this is the first page where his artwork appears right in the album. It was a delight to show the page to him when it was in the album and he clapped! That’s probably the biggest accolade I’ve ever had for scrapping, so I’m flying high now!

I’ve long had the Paislee Press Mini Masterpieces project in my bookmarks, thinking that big student portfolio may become unwieldy over the years to come and thinking a Photo Book would be a lovely way to keep the evidence without the complication. I’d love to see other ways you’ve kept child art, be it in your scrapbooks or another system of saving things. If it’s something you’ve shared online, by all means leave us a link in the comments. Or feel free to just share a thought of what has worked for you. I’m sure many of us go through this stage of wanting to find some sort of guidelines for which pieces we keep and which ones go from the fridge to the recycling bin!

And of course, links to your projects with the Minc are also welcome! If you have the Minc, do you find you use it more for small format projects like cards and gifts or is foil becoming a definite design theme in your scrapbooks?

Disclosure: Product links in this post are affiliate links. All are supplies I use and enjoy! Affiliate commissions on shimelle.com blog posts pay the guest artists who share their work here. Thank you for your support.

How to incorporate books into your crafting

how to incorporate books into your crafting @ shimelle.com // layout by sheena rowlands

It’s so exciting when one idea leads to another and another, and I love it when that happens in crafting. I love it when it happens for other crafters too so we can see their train of thought and how one idea jumps to another and another. That’s why this post from contributing designer Sheena Rowlands made my day. I hope her series of ideas sparks a few for you too!

I’m a real lover of books. I really enjoy reading when I get the chance, I like how they feel in my hand and the smell of the pages. I also like to collect books specifically to use with my hobbies. These are usually out of date or damaged or bought from markets or second hand stores. I like to think I’m giving them a new lease of life when I use them in my projects. I always use a digital copies of photographs in my scrapbooks so I’m not concerned that the books I use are not acid free. Here a few of my favourites.

how to incorporate books into your crafting @ shimelle.com // layout by sheena rowlands

I like to use books and book paper in a variety of ways and today I’m sharing with you four different projects showing how versatile and easy it is to use.

how to incorporate books into your crafting @ shimelle.com // layout by sheena rowlands

For this scrapbook page I wanted to use the book paper to help tell a story from my childhood. The journalling reads – As the daughter of an avid gardener, I spent my summers outside & my winters surrounded by gardening books and seed catalogues galore. This was the feel I wanted to get across when I looked at this layout. I took pages from an old gardening book,inked the edges lightly to evoke the look for being well thumbed and layered them up.The book cover is cardstock providing a base for the pages. To create the open book look I’ve cut the pages at a slight angle to give the impression it was intentionally open at these particular pages. I also cut some of the flower illustrations from the book to embellish the layout. The pastel tones of the Starshine papers and embellishments were perfect for matting my grainy old photos on giving a lovely spring feel.

how to incorporate books into your crafting @ shimelle.com // layout by sheena rowlands

For this Project Life spread I wanted to evoke the feeling of distance, travel and culture. Two of my children travelled to Japan last year for the World Scout Jamboree. They brought back with them from their trip booklets, tour guides, maps etc. Rather than use the originals for this page I scanned and copied pages so not to damage their souvenirs. Whenever I go travelling I always try to pick up a book in the launguage of the country to add to my collection.

how to incorporate books into your crafting @ shimelle.com // layout by sheena rowlands

I created a pocket to hold journalling tags with a train map and punched decorative circles from text paper to embellish my journalling all adding to the overall feel of the Project Life spread.

how to incorporate books into your crafting @ shimelle.com // layout by sheena rowlands

Book paper is great for making embellishments with too and for this card I made one large embellishment for the front using old school maths text book paper.

how to incorporate books into your crafting @ shimelle.com // layout by sheena rowlands

I drew out the star in pencil on the back before hand stitching around the edge. When I had sewn two thirds of it I added a little toy stuffing between the layers to add dimension before sewing it up. The background features the star stamp from the Starshine Collection heat embossed in clear on white cardstock before adding water colour paint over them. The Starshine chipboard sentiment finishes it off perfectly.

how to incorporate books into your crafting @ shimelle.com // layout by sheena rowlands

Finally an off the page project. I’m a scrapbooker first and foremost but I do like to dabble in other crafts, like I need another hobby! but I thought I would share a book fold I did as a gift for my Brother & his bride last year. There are lots of free patterns out there on the internet & its really easy to get the hang of once you get started. I’ve covered the covers of this book as they were damaged but you could also theme your fold with the book you choose too.

how to incorporate books into your crafting @ shimelle.com // layout by sheena rowlands

I’d love you to join me and create incorporating book paper, please share with us your creations.

Weekly Challenge :: Make your journaling the heart of your scrapbook page

weekly challenge :: make your journaling the heart of your scrapbook page // scrapbook page by Shimelle Laine

I’m a firm believer that we all have our own unique blend of why we scrapbook. For some it is 95% about the photos and 5% about trying new stamps. For others it is 33.3% a love of pretty paper, 33.3% a love of pretty photos, and 33.3% a love of a little quiet time not to worry about much else in the entire world. And as much as I love the pretty paper and as much as I love the pretty photographs, my personal blend weighs very heavy on the writing. Sometimes it’s a lot and sometimes it’s just a little, but for me, the journaling is what makes it part of a bigger story I tell page by page, and that makes me a collector of ways I can incorporate those words on my pages when there are times I don’t really fancy just adding a journaling box or some lines.

weekly challenge :: make your journaling the heart of your scrapbook page // scrapbook page by Kirsty Smith

Here’s a case in point: a tutorial Kirsty Smith shared here many moons ago. It’s such a favourite of mine that I’m bringing it back this week specifically for this challenge.

I challenge you this week to make journaling the heart of your scrapbook page, taking inspiration from Kirsty’s tutorial. The subject matter and how you take the inspiration is completely up to you, so you can go in any direction you like! To get you started on this week’s challenge, take a look at these examples from contributing designer Leigh Ann Odynski and guest artist Mari Clarke. As a bonus, both have shared videos of their process today!

weekly challenge :: make your journaling the heart of your scrapbook page // scrapbook page by Leigh Ann Odynski

Taking inspiration from Kirsty Smith and her layout with “How to hide journaling in plain sight”, I wanted to use the journaling as a design element on the page. Typically, I add the journaling into the design already on the page and size it to fit on my computer, then print it on my home printer. This time, I thought about how I could still stay true to my style, but incorporate the journaling in a more unique way, thinking about the journaling at the beginning of the process rather than near the end. That’s how I came up with the little labels stitched to the bottom of the page. The EK Success label punch made quick work of punching out all those little journaling boxes.

weekly challenge :: make your journaling the heart of your scrapbook page // scrapbook page by Leigh Ann Odynski

The next portion of this teen layout came about really quickly once I found this free cell phone cut file from Scrapbook and Cards Today Magazine. What goes together better than teens and cell phones? After I chose a variety of patterns from the Shimelle Starshine line – I used 12 in all – I cut the shadow from the patterned papers and the cover in white. Added a vellum “screen” for the phone and they look so cute!

Next, you can add vellum, transparency, or printed cellophane like this one from Heidi Swapp, under the die cuts at the top of the page for added texture and interest.

weekly challenge :: make your journaling the heart of your scrapbook page // scrapbook page by Leigh Ann Odynski

Then, you can add more patterned papers under your photo to tie in all the color at the top of the page. It was so much fun adding in different layers of embellishments with the Shimelle stickers, wood buttons, enamel shapes, epoxy paper clips, and cardstock and acetate pieces from the die-cut pack.

weekly challenge :: make your journaling the heart of your scrapbook page // scrapbook page by Leigh Ann Odynski

My focus for this layout was teen life now, so the title “Life @ 17” came to mind. All the little journaling labels tie in with facts about life and technology, and facts from the US Census Bureau on US households and computer and internet use. Use your country’s stats to personalize your page, and have a go at this fun challenge! You can capture this moment in time for your teen, and wouldn’t you love to have a page like this from your teen years, or your parents’ teens? What a different set of pages they would be!

Thank you for stopping by today, and enjoy the rest of your day!
- Leigh Ann

weekly challenge :: make your journaling the heart of your scrapbook page // scrapbook page by Mari Clarke

I love to scrapbook using photos of my son and daughter when they were teenagers. They were such fun years, and I love to document the stories of those days so we won’t forget the details. Teenagers can be very sensitive when it comes to what parents share about them. When I was creating this layout, I chose to keep the majority of the journaling hidden to ensure that the big story would remain a mystery when first glancing at the layout.

weekly challenge :: make your journaling the heart of your scrapbook page // scrapbook page by Mari Clarke

The ‘hidden in plain sight’ technique from Kirsty was just right for this page, and something that was refreshing to try without being difficult or time-consuming.

The journaling is handwritten on 12×12 white cardstock; I then placed a piece of vellum over the journaling and created the rest of the layout on the vellum overlay. I secured the vellum to the cardstock with a paperclip from the Starshine collection. Just remove the paperclip and slide the journaling out to read the details. The floral washi tape from Starshine made for a beautiful but super easy detail to divide the page and add colour.
- Mari


You have a week to complete the challenge and share a link – but of course you’re welcome to set your own time schedule. Whatever keeps you happy and creative!

Today’s Guest Artist: Mari Clarke loves creating, teaching, and drinking lattes in the sunshine. You can find more from Mari on Instagram, YouTube, and her blog.

Glitter Girl Adventure 137: An Inky Experiment

Glitter Girl Adventure 137: An Inky Experiment // Distress Ink scrapbook page by Shimelle Laine

I can’t entirely explain why I have collected a full box of Distress Inks in a range of colours when I don’t do much in the way of inking techniques. I love the looks and could watch card making videos of Distress techniques all day in some land of fairy tales and yet I only seem to make cards when I’m in panic mode and can’t devote time to trying something new and experimental. But I do spend time on my scrapbook pages! There is no good reason not to just put those inks to use, even with all the little tricks that make them different to a standard dye ink pad. It’s time for Glitter Girl to get on the case.

The combination of pencil and the heart stencil was inspired by Kirsty Smith’s page here. Kirsty often works with many white elements on a page, but I almost always go for fully saturated colours, so swapping from traditional pencil to coloured pencil was perfect for adapting the idea!

Glitter Girl Adventure 137: An Inky Experiment // Distress Ink scrapbook page by Shimelle Laine

This page features the Starshine and True Stories collections, along with washi tape strips and tiny heart stickers from Studio Calico, and Ranger Distress Inks.

If you enjoy Glitter Girl’s Adventures and chatting about scrappy things, please find us on Facebook: Scrapbook like a Superhero is a group of scrappers with plenty of ideas to share and possibilities to discuss.